Can't find the fish? Here are some expert trolling tips to help you out
Story by T.J. Schwanky and illustrations by Mike Del Rizzo
Advertisement
For many anglers, trolling means little more than chucking out a lure behind the boat and letting out enough line until it begins bumping bottom. But for anglers in the know, there’s an awesome fishery suspended farther up in the water column—and it’s often left untapped. All it takes is the right gear and technique to find it. Here’s how.
Walleye: Weigh your options
There’s little doubt that walleye do a great deal of their feeding close to the bottom. But in nearly every lake in Canada, there will also be some suspended fish actively feeding. This is especially true where there are good populations of whitefish and ciscoes. Often, these fisheries are left virtually untouched, and during July, August and September, they can offer the best angling on the lake. The key to catching these suspending ‘eyes is to figure out the depth at which they’re feeding. On Saskatchewan’s Last Mountain Lake, for example, it’s common to mark suspended walleye in a 20- to 25-foot window, but they might only be actively feeding in a 10-foot window.
Advertisement
Locating suspended walleye is not as difficult as you might think. These fish love structure, and even when they suspend, they’re typically near a major piece of structure. If I’m fishing a body of water for the first time and want to find out if there is indeed a suspended walleye fishery, I’ll begin my search by cruising the waters near a point or drop-off, keeping a close eye on my sonar. If I start marking fish anywhere from six feet off the bottom and higher, it’s a spot I’m going to spend some time fishing. Once I’ve figured out the depth at which the fish are feeding, I may expand my search. That said, I’ve found that the most productive depth stays pretty consistent throughout the day, barring any major changes in weather.
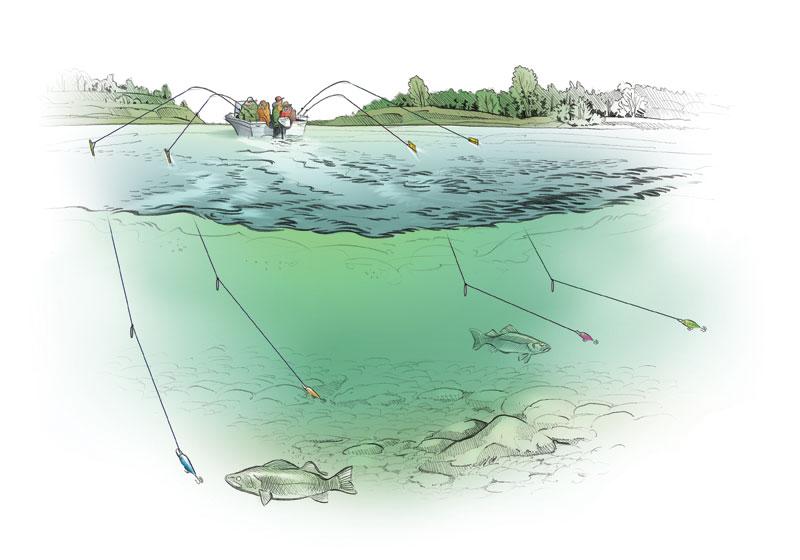
I must admit to having experimented with countless methods of targeting suspended walleye, but it’s the so-called 50/50 system that I rely on exclusively today. Not only is it simple, but it requires very little specialized gear. All you need is a line counter reel on a seven-foot trolling rod, an assortment of snap weights, some in-line planer boards, a selection of shallow-running crankbaits, some rod holders and a few buddies with fishing licences (with anglers permitted to use only one rod each in most areas, it’s advantageous to have four anglers in the boat so you can troll at several different depths).
First, make sure all four reels are spooled with the same type of line; I typically use 10-pound monofilament. Then, tie on identical crankbaits. In most waters, good first choices include the Storm Thunderstick, Rapala Tail Dancer or Reef Runner Ripstick. The lures can be different colours, but they must be the same size and model. Next, let out 50 feet of line on each of the rods and attach a snap weigh. Here’s where you’ll find the only variable: each snap weight should be a different weight, starting with a half ounce on the first line, then increasing in size by half-ounce increments for each of the remaining lines; the heavier the weight, the deeper the lure will run. Finally, let out another 50 feet of line. I usually run all four lines on side planer boards, as I like the action they impart to the lures. If you have a fifth person in the boat, try running one line straight behind the boat with no weight at all.
Advertisement
Begin trolling over the area where you’ve marked fish. When you start catching them, simply adjust the weights on the other lines to match the one that’s catching fish. If I don’t catch anything in the first 30 minutes, I increase the weight range—hence depth—until the fish start hitting.

Lake trout: Snap to it
Lake trout love clear, cold water; that’s why they inhabit the deepest recesses of the lake, save for a few weeks in the spring and fall. But over the years, I’ve found that a large number of lakers will also suspend high in the water column. And when they do, it’s for one reason: to eat. In lakes with only one or two deep basins, keying in on these fish is easy-they’ll be suspended over the deepest areas. On a fly-in trip to Alberta’s Andrew Lake one August, for instance, we fished exactly this scenario. There were two basins in the lake that were more than 100 feet deep, and while we could catch trout near the bottom, the real bonanza was 40 feet up.
Advertisement
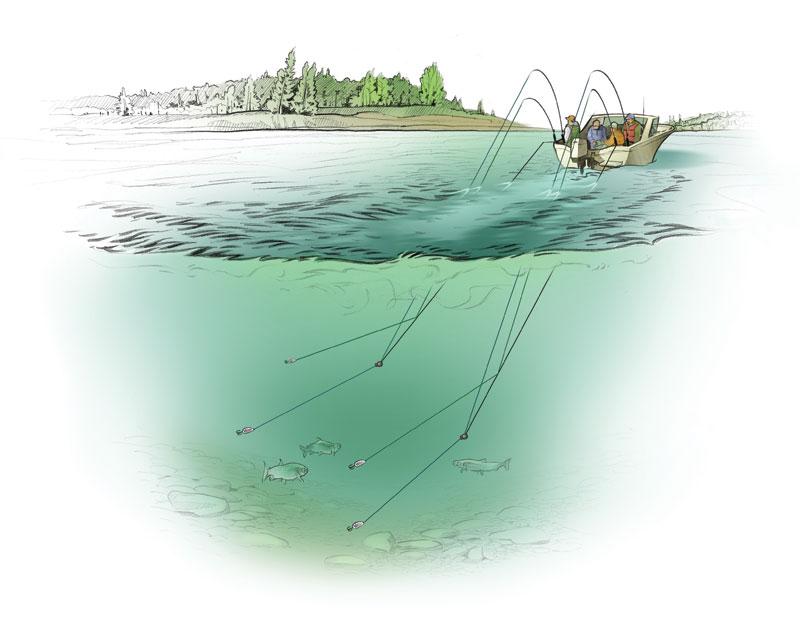
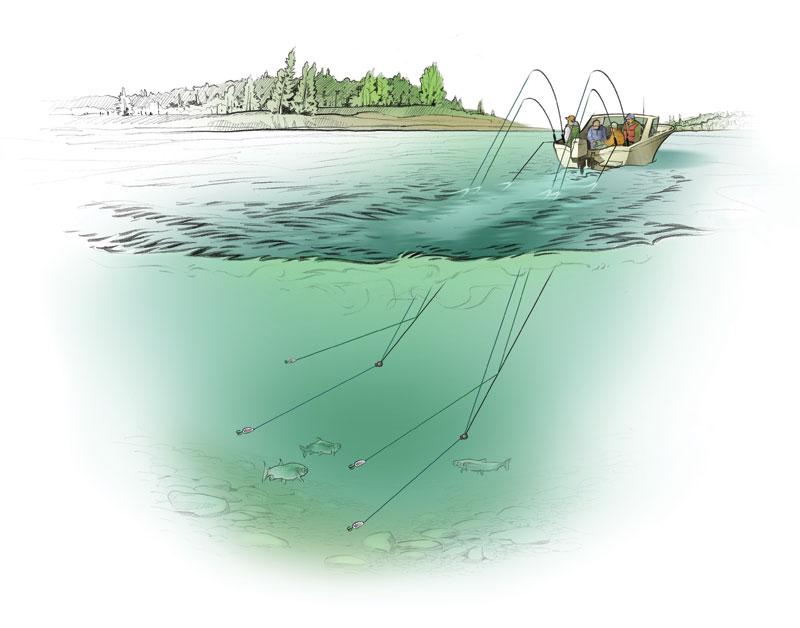
Sonar is the key to finding suspended lake trout, but, as with walleye, locating them is only half the battle. The real trick is to hone in on the depth at which they’re feeding. For this, I like to use downriggers. While this may conjure up images of huge Great Lakes boats, with their aft decks covered in electric downriggers, there are countless economy models that work just fine on even the smallest boats. On the Andrew Lake trip, we took a couple of clamp-on downriggers that worked perfectly on our small aluminum boats. Other than that, the gear is pretty simple. You’ll need a fibreglass downrigger rod spooled with 10-pound-test mono for each angler in the boat, and a selection of spoons. I’ve had great luck with the Blue Fox Pixie, Mepps Syclops and, of course, Len Thompson’s Yellow and Red.
Now, downrigging is hardly a revolutionary technique for lakers. However, the use of stacking releases isn’t that common and it’s key to getting the most out of your downrigger-and getting your lures down to where the fish are holding. With stacking releases, it’s easy for four anglers to cover 40 feet of the water column with just two downriggers. (And the great thing about lake trout is they’ll move several feet up the water column to grab a lure, so you don’t need to be as precise as you do with walleye.) Using the sonar, say I mark fish from 40 to 80 feet. What I then do is run one lure behind the downrigger ball at 70 feet and run a stacking release on another line 20 feet higher. Then, on the other downrigger, I run one lure behind the ball at 60 feet and another on a stacking release 20 feet higher. This way I have lures at 70, 60, 50 and 40 feet. Of course, once you start catching fish at one of those depths, you’ll want to adjust the other lures accordingly. Keep in mind, though, that lake trout are notorious for changing depths throughout the day, so be ready to widen your search if the action slows.

Pike: Hit the zone
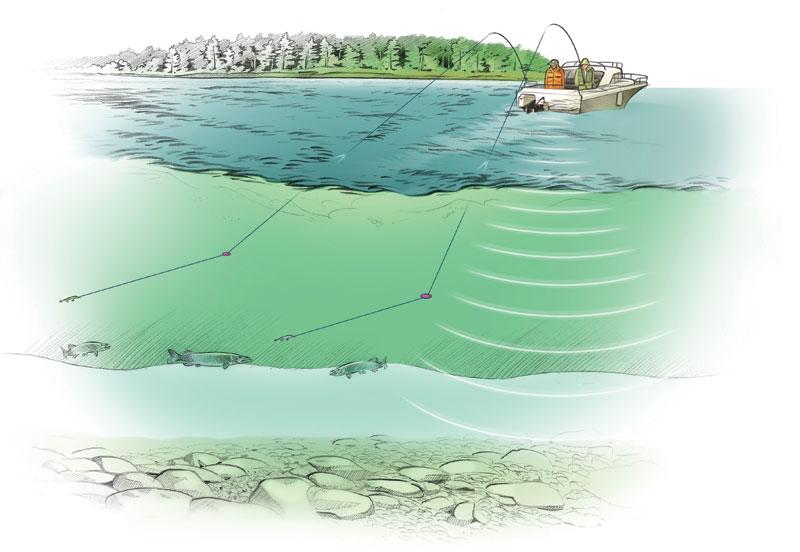
Occasional pike anglers will find it hard to imagine that these toothy predators hang out anywhere but in the thickest of weeds. In truth, pike, especially the big trophies, love cold water. In all but the most northern climes, that means they head for deeper water during the dog days of summer. And, in lakes with good populations of whitefish and ciscoes, you can count on finding an awesome suspended fishery. The real key here is to locate the thermocline and fish just above it. While whitefish and ciscoes can survive in the low oxygen levels beneath the thermocline, pike can’t. Instead, they’ll cruise just above it, waiting for tasty morsels to venture out. This typically happens twice a day during the shoulder hours, when the sun is rising and setting. I usually begin my search in close proximity to a major point or drop-off, but it’s the thermocline that really matters.
A good sonar unit is essential for quickly locating the thermocline. The sudden change in water temperature creates enough change in the density of the water to make it show up as a thick, grey line on most quality sonars. As pike relate so strongly to this thermocline and rarely venture far from it, an extremely precise presentation is required. If the thermocline is not too deep and I can get a deep-diving crankbait down there, I will. There are some great dive charts on the market, such as the Precision Trolling guide, that will tell you exactly how deep your cranks will run. With that information and a line counter reel on a trolling rod, it’s possible to place your lure within a two- to three-foot window.
There are numerous crankbaits that dive deeper than 30 feet, but if the thermocline is too deep, I use an in-line diver, such as Luhr Jensen’s Pink Lady. These come with a very accurate dive chart, and with the help of a line counter reel, it’s possible to hit a three-foot window. I typically tie a large shallow-diving crankbait 10 feet behind the diver and follow the chart as to how much line to let out to get it to the desired depth.
Whether I’m trolling deep-diving cranks or shallow-running ones behind an in-line diver, I set the bait to run three to five feet above the top of the thermocline. (Remember, you have a much better chance of hooking any fish by running a bait above its head, rather than below.) If there are multiple anglers in the boat, I alter the running depths of the baits by a couple of feet, yet still keep them close to the top of the thermocline. My advice after that? Hang on tight.

Troll, catch fish, repeat
With all three of these trolling techniques, it’s crucial that you pay attention to the different variables at play: your trolling speed, the depth at which the lure is running, the length of line you have out, the size of the weight, and so on. Once you hook a fish, you’ll want to replicate the same scenario so you can repeat your success—and enjoy some of the best angling of the summer.

